Linarc allows you to create a new PDF template from scratch when existing templates don’t meet your needs. You can customize the template layout to align with your document standards.
Note:
- Only one user-generated (custom) template can be active at a time for each document type.
- When a custom template is activated, it automatically overrides the system template and applies to all related documents.
- If no custom template is activated, the default system template is applied.
- All PDFs, whether generated on demand or when a document is closed, use your company’s active template.
Create a New Template
Ensure you are in the portfolio console, which opens when you log in.
- Click the logo at the top-left to return to your portfolio console if are you in a different module
- Click ‘Configure’ at the top of the portfolio console.
- Click ‘Single Object’ on the left
The PDF configuration screen opens with the list of available templates for different document types:
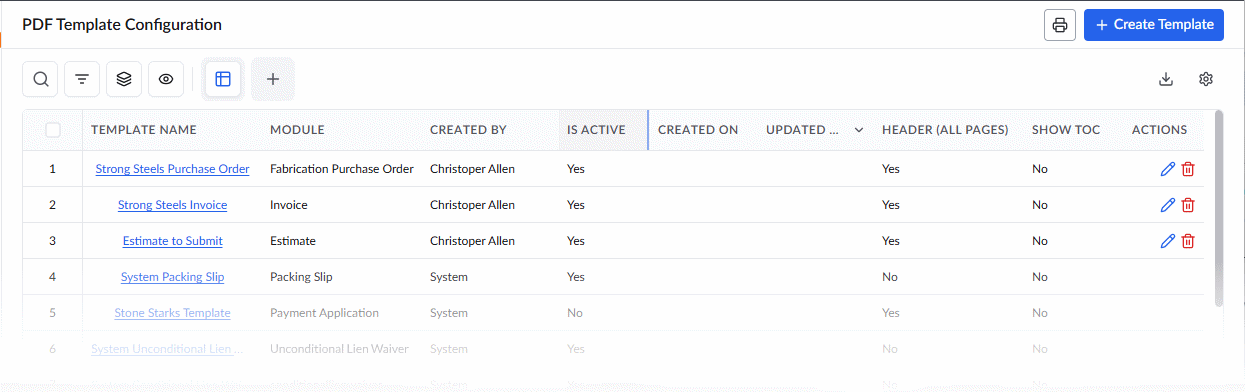
- Click the '+Create Template' button at the top right

- Select Module - Select the document type the template applies to
- Title - Enter a label for the template
- Click the 'Create' button to open the blank template
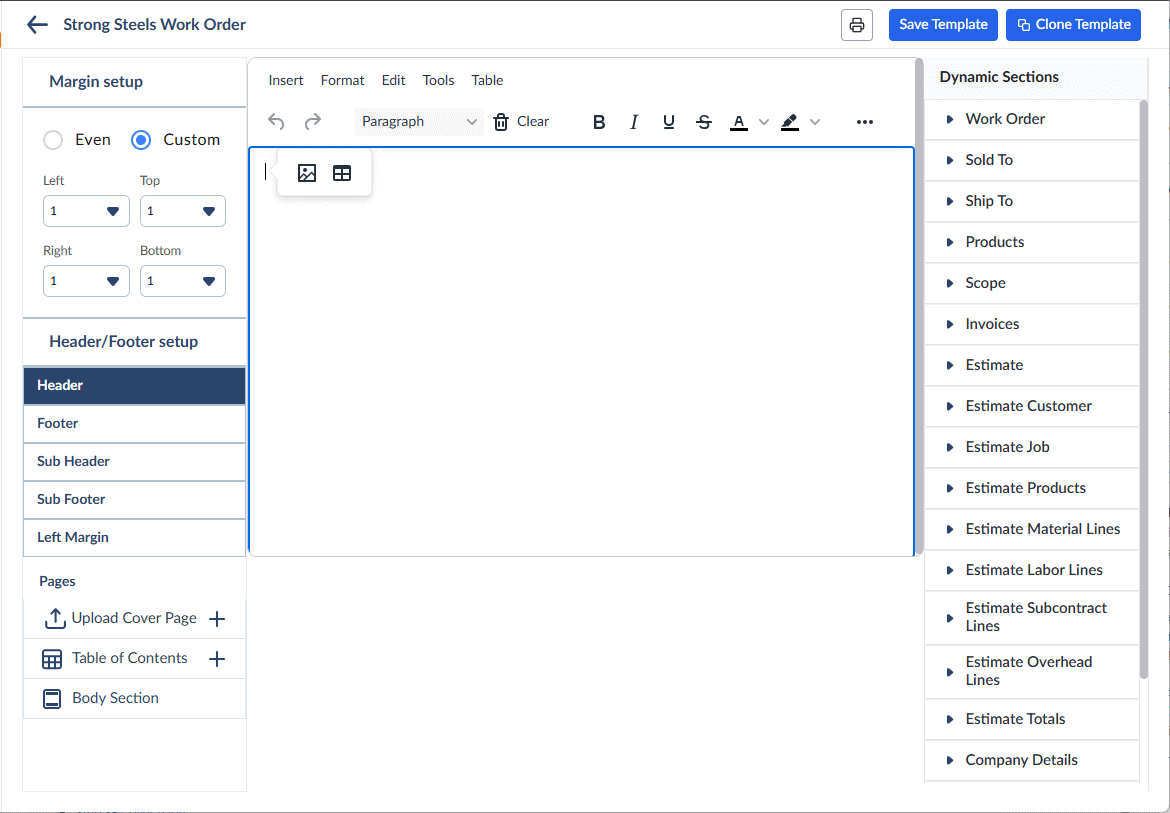
The template editor is divided into three sections for easy customization:
1. Left pane - Manage the page layout, with headers, footers, body section, etc.
2. Center pane - Configure the sections by entering the text and placing the dynamic variables.
3. Right pane - Select the content in the included sections by placing the document-specific and generic elements as dynamic variables
Use the links below to jump to the section you need help with:
- Create a New Template
- Formatting options
- Insert Images
- Add Horizontal Line
- Insert Dynamic Fields
- Step 1- Margin Setup
- Step 2- Layout Setup
- Step 3- Cover Page
- Step 4- Table of Contents
- Step 5- Document Content Setup
- Step 6- Save and Activate your Template
Formatting options
The 'Template Editor' gives you full control to customize the appearance of the content with a variety of formatting tools. You can insert images, links, tables, and horizontal lines, as well as adjust visual styles to match your organization’s branding. The Format menu provides options ranging from text colors to background customization for your template. You can also use the formatting tools at the top of the editor to format the added text.
- Click 'Insert' to add images, add tables, hyperlinks, line breaks, etc
- Click 'Format' menu at the top of the editor to explore available options, or quickly apply changes to the inserted text using the formatting tools in the toolbar.
- You can also use the shortcuts for formatting and inserting tables or images, available in the toolbar.
Insert Images
- Place the cursor where you want the image in the template.
- Click 'Insert' at the top and choose 'Image'.
- Alternatively, to upload a picture from your device, click the
 icon from the toolbar and browse to the image file. Once inserted, you can resize it by dragging the corner handles.

You can add an image in two ways:
1. Insert via URL – Ensure you're in the 'General' tab and paste the image URL into the 'Source' field. This is useful if you don’t want to permanently embed the file or if the image is expected to change over time. Any update to the image at the URL will automatically reflect in your template at the time of document generation. You can also define the display size of the image.
2. Upload from device – Select 'Upload' on the left, then drag and drop the image into the box.
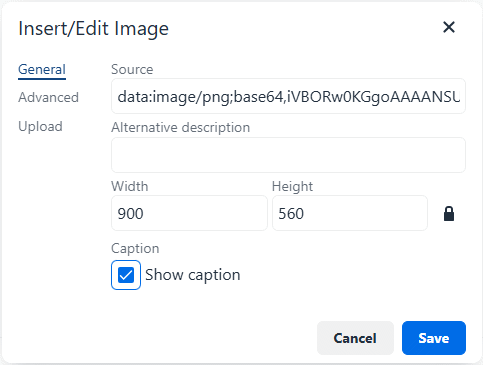
Optional Configurations
Resize the image – Specify width and height in pixels. To maintain aspect ratio, click the lock icon to keep dimensions proportional.
Spacing and borders – In the 'Advanced' screen, set margins on all sides and adjust border width, style, and other formatting options.
Show Caption - Select to add a caption such as a label or description.
- Click 'Save' to place the image in the template.
Example:
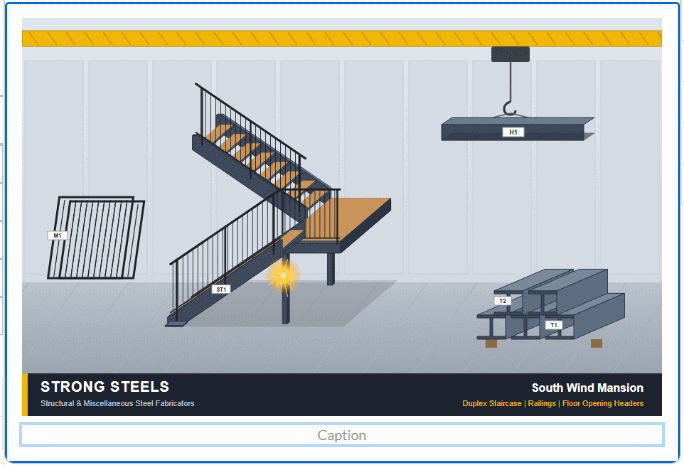
If you selected ‘Show Caption’, a caption field appears below the image.
- Type your description in the 'Caption' field
Add Horizontal Line
You can add a horizontal line to give visual section breaks.
- Use the 'Insert' menu at the top and select 'Horizontal Line'
Insert Dynamic Fields
The 'Dynamic Selections' pane on the right lets you add context-specific and generic content blocks to your PDF template. Linarc provides the following elements to be added to your template.
- Click the right arrow beside a category to expand the items under that category
- Click where you want the field in the center pane, then click ‘+’ next to the field.
- Document Type Specific Elements: Based on the document type, Linarc provides content blocks that can be added to any part of the document layout. Each block includes elements that are directly related to the selected document type. For example, in an Estimate template, fields such as Estimate Product Lines, Estimate Material Lines, and more.
- Company Details: These fields automatically pull information about your company:
- For manually generated documents (on-demand), the details come from the company of the employee downloading the PDF.
- For auto-generated documents (created upon closure of the document’s approval lifecycle for archival), the details reflect the company that finalized the item.
Available Fields:
- Company Name – The registered legal name of the company.
- Address – The official business address.
- Created On – The date the company profile was registered on Linarc.
- Contact Number – The primary company phone number.
- Project Details: Fields that reference the information about the project.
- Job ID – The unique identifier assigned to the project by your company.
- Project Name – The name of the project.
- Site Location – The address or location of the construction site.
- Created By – The name of the user who created the project on Linarc.
- Role Type – The creator’s role in their company.
- Project Status – The current state of the project
- Project Type – The category or type of project, such as Commercial, Residential, or Infrastructure.
- Employee Details: These fields automatically pull information about the member associated with the document.
- For manually generated documents (on-demand), the details come from the member downloading the PDF.
- For auto-generated documents (created upon closure of the document’s approval lifecycle for archival), the details reflect the member who closed the item.
Available fields:
- Employee Name – The team member who generates the PDF document
- Employee Email – The member's official email address.
- Employee Phone – The member's contact phone number.
- Full Name – The first name, middle name, and last name of the member.
- Role Name – The designation or role assigned to the member (e.g., Project Manager).
- Default Details: General fields available across all templates, such as creation date, page number, and other commonly used placeholders.
- Date – The creation date of the PDF.
- Current Page Number – Displays the number of the current page in the PDF.
- Total Page Number – Displays the total number of pages in the PDF.
Use the links below to jump to the section you need help with:
- Step 1- Margin Setup
- Step 2- Layout Setup
- Step 3- Cover Page
- Step 4- Table of Contents
- Step 5- Document Content Setup
- Step 6- Save and Activate your Template
Step 1- Margin Setup
You can customize the margins of the pages to align with your organization’s formatting preferences.
- Even Margins – Enter the margin space (in pixels) that applies to all four sides of the pages equally.

- Custom Margins – Enter specific margin spaces (in pixels) for the top, bottom, left, and right sides.

Step 2- Layout Setup
You can configure page headers and footers, and customize the overall document structure.
- Add header and subheaders
- Add footer and subfooters
Add Header and Footer
The header and footer appear only on the first page, typically used for details like company name, logo, or project title.
- Click the '+' icon of the required elements on the right pane to add them in your template. You can also do the following directly on the template editor:
- Text – Insert a single line of text, such as the document title, labels, or notes.
- Image – Add images, such as your organization's logo.
- Date – Displays the date the document was generated.
- Table- Insert table to place text or images at a required position. You can also use tables without borders to place logo images and details like company name, address, etc., at desired positions.
Add Subheader and Subfooter
Applied to all subsequent pages of the document, ensuring consistent information such as page numbers, dates, or project details throughout the document.
- Click the '+' icon of the required elements on the right pane to add them in your template. You can also do the following directly on the template editor:
- Text – Insert a single line of text, such as the document title, labels, or notes.
- Image – Add images, such as your organization's logo.
- Page Number – Automatically displays the current page number.
- Date – Displays the date the document was generated.
- Table- Insert table (a row/column) to place text or images at a required position
Add Left Margin
Applied to all inner pages of the document. Use the left margin to add initials and signatures.
- Click the '+' icon of the required elements on the right pane to add them in your template.
Step 3- Cover Page
Set up your branded cover page for that type of PDF files. You can upload the cover page image. All image files are supported.
- Click '+' in the 'Upload Cover Page' stripe on the left
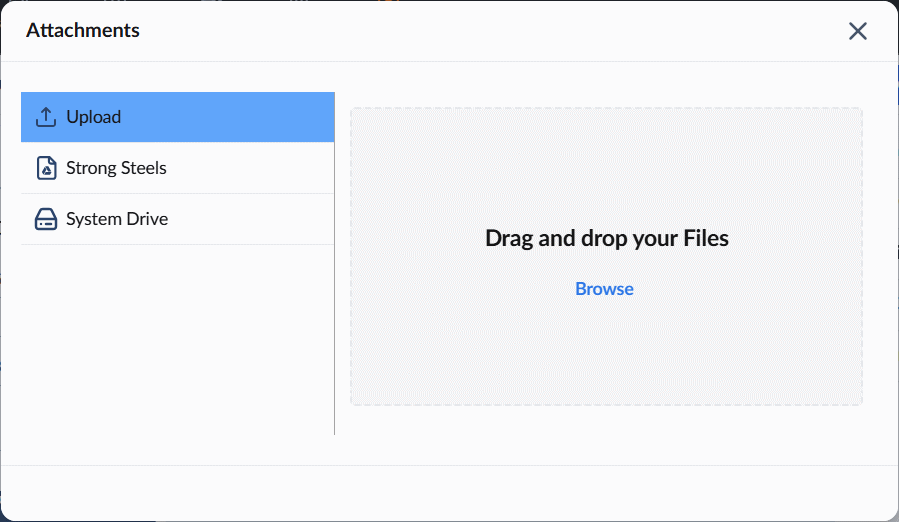
- To upload an image from your device, select 'Upload' and drag and drop the file to the right pane.
- Alternatively, click 'Browse' and navigate to the required file.
- To use an image already in Linarc, choose ‘Company Drive’ and browse to the file.
Step 4- Table of Contents
Linarc automatically generates a table of contents with clickable links, allowing users to quickly navigate through the PDF document
- Click the '+' button next to Table of Contents in the left pane.
Step 5- Document Content Setup
- Select 'Body Section' on the left
- Type your text and use the document-specific and general elements from the right pane to build and customize the body content of your PDF template.
- Add elements to the template by clicking them from the right pane to complete your preferred layout. You can add text, images, tables, and page breaks as mentioned above.
Step 6- Save and Activate your Template
- Click the 'Save Template' button at the top

- Click the 'Active' check box for the template to replace the currently active system or user template.
- Click the 'Save' button
You can also clone an existing user or standard template and edit it to your preference to create a new template. See Clone a PDF Template for more details.
Was this article helpful?
That’s Great!
Thank you for your feedback
Sorry! We couldn't be helpful
Thank you for your feedback
Feedback sent
We appreciate your effort and will try to fix the article