Linarc lets you build an estimate for a job from scratch whenever a client, either a general contractor or a direct customer, asks you for a quote, for example through a request for proposal (RFP). You set up the estimate product by product and cost line by cost line, so it matches the scope in the client's request exactly.
- Built around your products: List each product the client asks for. Linarc breaks every product down into its material, labor, subcontract and overhead costs.
- Margins on every line: Set a margin on each cost line, and the amounts, totals and sales tax are calculated automatically.
- Your company's data: Pick cost codes, suppliers, subcontractors and customers from your company's own lists.
- Built-in checks: Linarc flags missing details and cost lines that don't add up to a product's rate before you generate the estimate document.
- Ready to send: Generate the estimate as a PDF on your company's template and send it to your client straight from Linarc.
Linarc gives you the flexibility to set up an estimate in two ways on the 'Draft Estimates' screen:
- Create Estimate Manually – Build the estimate from scratch, step by step, directly on the screen.
- Import Your Estimating Sheet – Download the sample estimating sheet in Excel format, fill in your values and upload it to create the estimate in one go.
Once your estimate is set up, you can generate the estimate document as a PDF using the estimate template configured for your company and submit it to your client. You can send it directly from within Linarc using the built-in email client, or share it through any other communication channel. See Submit a Bid for details.
How an Estimate is Structured
Every estimate is built in the following steps. You can move between them using the tabs at the top or the 'Next' and 'Back' buttons at the bottom of the screen.
- Estimate – The customer and job details, such as the customer, point of contact, job name, estimate number, site address and delivery date.
- Product Estimate – The products you will fabricate for the job, with the quantity ordered and the rate for one unit of each product.
- Material, Labor, Subcontract and Overhead – The cost lines that make up one unit of each product. Each cost line is tagged to a product and carries its own margin.
- Estimate Document – The PDF estimate document generated from your estimate.
The cost lines on the Material, Labor, Subcontract and Overhead steps split the rate of each product, so they must add up to the product's rate before the estimate document can be generated. Any missing or mismatched values are flagged in red, and a message at the bottom-right of the screen tells you what needs fixing.
Best Practice: Set up your company's cost codes, suppliers and subcontractors before you start estimating. Every cost line uses a cost code from your company's list, and suppliers and subcontractors are picked from your company directory. If you import an estimate from an Excel sheet that names suppliers or subcontractors not yet in your directory, you can add them during the import by entering their contact details.
To set up an estimate
Ensure that you are on the 'Draft Estimates' screen. If not:
- Click 'Estimates' at the top.
- Select 'Draft' on the left.
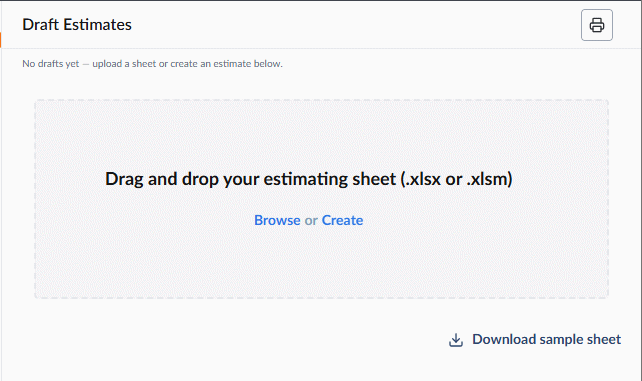
You can set up the estimate in two ways:
Create Estimate Manually
Manually creating an estimate involves the following steps:
- Step 1 – Start a New Estimate
- Step 2 – Enter the Customer and Job Details
- Step 3 – Add the Products
- Step 4 – Add the Cost Lines
- Step 5 – Generate the Estimate Document
You don’t have to complete Steps 3 and 4 in strict order. Use the tabs at the top or the ‘Back’ and ‘Next’ buttons to move between them at any time. For example, add a product, add its cost lines, then go back and add the next product.
Step 1 – Start a New Estimate
- Click 'Create' in the upload area on the 'Draft Estimates' screen.
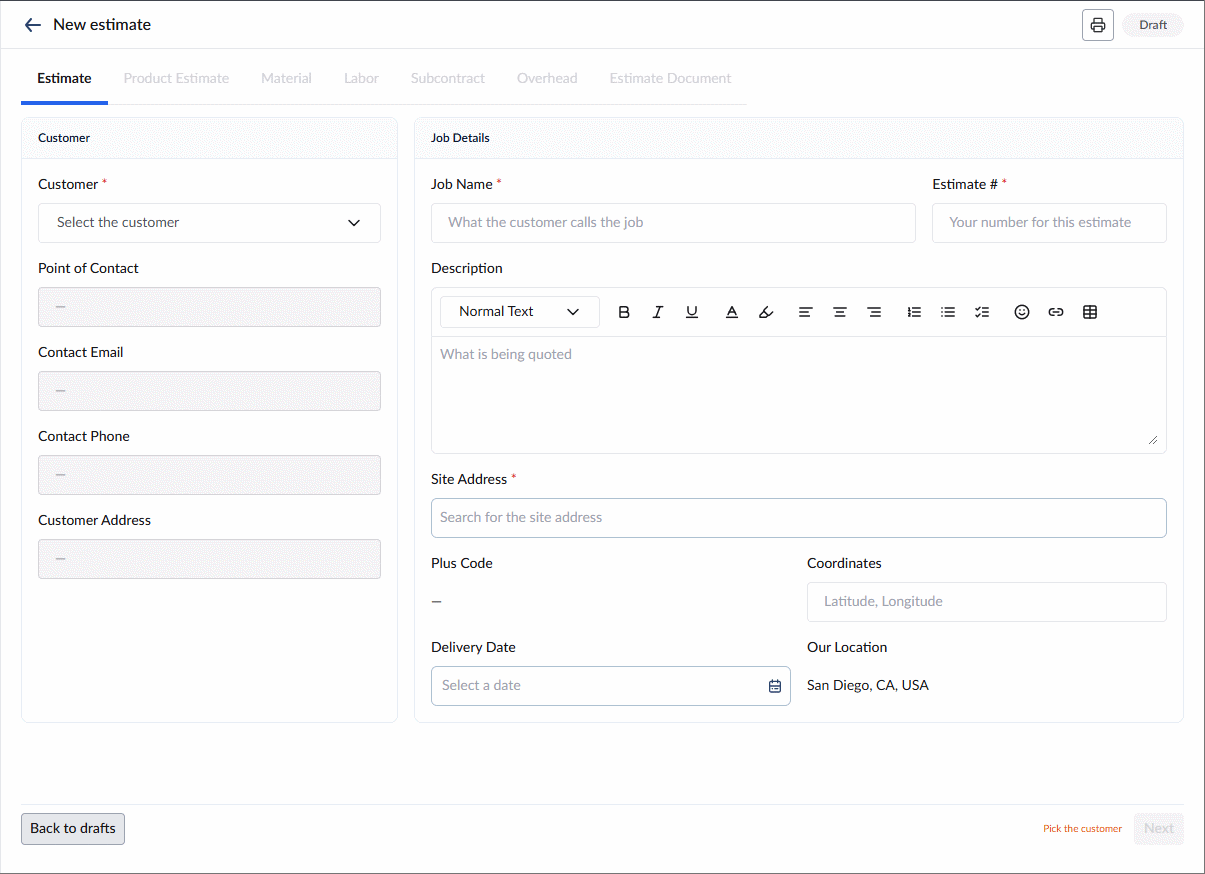
A new draft estimate opens on the 'Estimate' step. Your changes are saved automatically as you work, and the save status is shown at the top-right.
Step 2 – Enter the Customer and Job Details
- Enter the following details. (Mandatory fields are marked with an asterisk.)
Customer
- Customer – Select the client from the drop-down. The point of contact, contact email, contact phone and customer address are filled in from the customer's record. To add a new customer, click '+ Add customer' in the drop-down, and enter their details.
Job Details
- Job Name – The name of the job or project the estimate is for.
- Estimate # – Your reference or serial number for the estimate. Each estimate must have a unique number.
- Description – A brief description of what is being quoted.
- Site Address – Start typing the address of the job site and select it from the suggestions. The Plus Code and Coordinates are filled in automatically.
- Delivery Date – The date by which the fabricated products are to be delivered.
- Our Location – Your company's location, shown for reference.
- Click 'Next'.
Step 3 – Add the Products
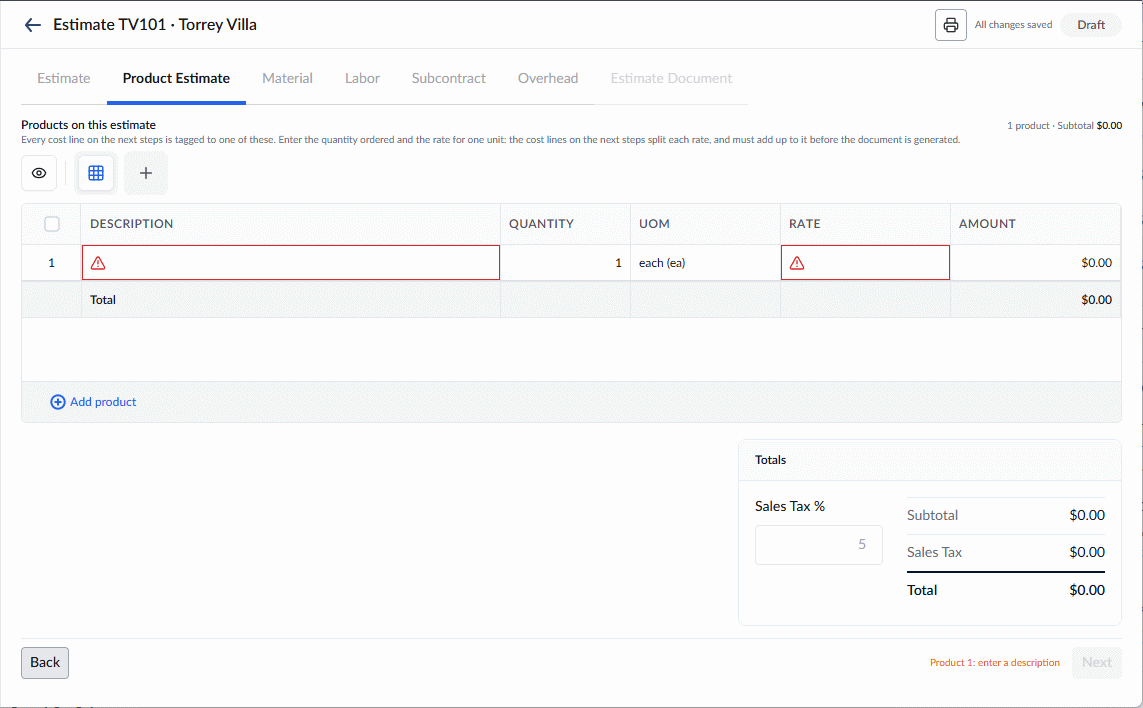
- Click 'Add product' in the 'Product Estimate' step to enter the details of each product you will fabricate for the job. Enter the following values:
Description – The name of the product.
Quantity – The number of units ordered.
UOM – The unit of measurement.
Rate – The price for one unit of the product.
Amount – Calculated automatically as Quantity × Rate.
- Click 'Add product' and repeat the process to add more products.
- Enter the Sales Tax % in the 'Totals' panel, if applicable.
The subtotal, sales tax and total are calculated automatically.
Until you add cost lines that add up to a product's rate, the rate is flagged with a warning. Hover over it to see the amount still to be added.
- Click 'Next' once you have added all the products.
Step 4 – Add the Cost Lines
Add the cost lines that make up one unit of each product, on the following steps in turn:
- Material
- Labor
- Subcontract
- Overhead
On every step, click 'Add line' for each cost line and enter the values.
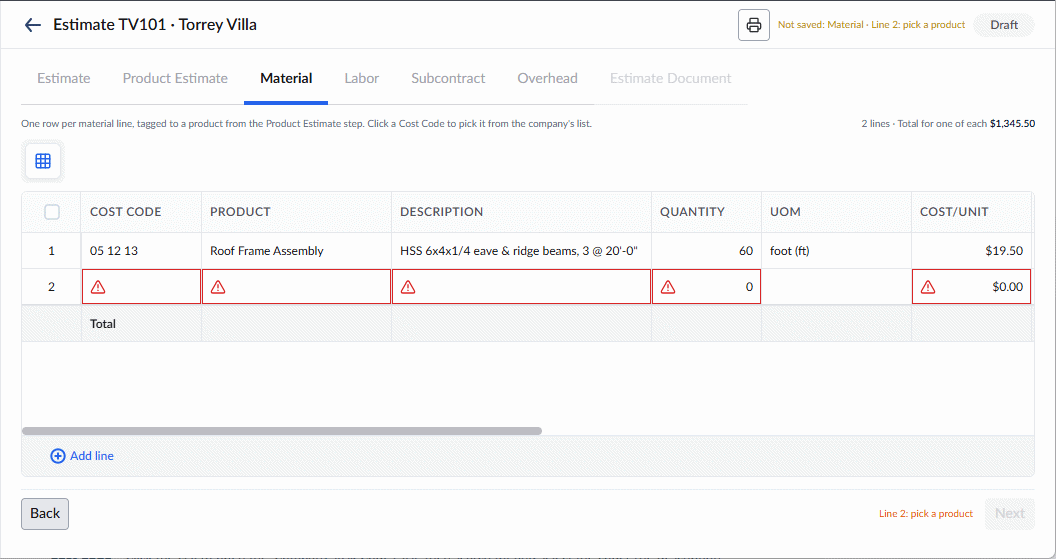
The following columns are available on every step:
- Cost Code – Click the cell to open the 'Company Task Codes' list, then search for and select the code. The description is filled in from the code, and you can edit it as needed.
- Product – Select the product this cost line belongs to, from those added on the 'Product Estimate' step.
- Description – The description of the cost line, for example, the component name, the labor task or the expense.
- Margin % – Your margin on the line. The Margin $ and Total Amount are calculated automatically.
Each step also has its own columns, described below. The number of lines and the total for one of each product are shown at the top right of each step.
Step 4-1 – Material
- Add one row per material line, and enter:
Quantity, UOM and Cost/unit – The amount of material, its unit of measurement and the cost per unit. The Amount is calculated automatically.
Total Weight – The weight of the material (if applicable).
Quote No. and Supplier – The supplier's quote reference, and the supplier, selected from your company directory.
- Click 'Next'.
Step 4-2 – Labor
- Add one row per job role, per product, and enter:
Job Role – The role doing the work, for example, Detailer, Fitter or Welder.
Hours – The hours needed for one unit of the product.
Rate/hr and Burden/hr – The hourly wage rate and the hourly burden. The cost is calculated as Hours × (Rate + Burden).
- Click 'Next'.
Step 4-3 – Subcontract
- Add one row per subcontracted scope, such as painting or galvanizing, and enter:
Subcontractor – Select the subcontractor from your company directory.
Quantity, UOM and Cost/unit – The quantity of work, its unit of measurement and the subcontractor's cost per unit.
Quote Reference – The subcontractor's quote reference.
- Click 'Next'.
Step 4-4 – Overhead
- Add one row for each freight, consumables or other overhead cost, and enter:
Amount – The overhead cost.
- On this step, 'Generate' replaces the 'Next' button. See Step 5 – Generate the Estimate Document.
Step 5 – Generate the Estimate Document
Once the cost lines of every product add up to its rate, click 'Generate' on the 'Overhead' step to create the estimate document. See Submit a Bid for the next steps.
Import Your Estimating Sheet
Importing an estimate from an Excel sheet involves the following steps:
- Step 1 – Download the Sample Sheet
- Step 2 – Prepare Your Estimating Sheet
- Step 3 – Upload the Sheet
- Step 4 – Review and Correct the Values
- Step 5 – Build and Manage Rows
- Step 6 – Generate the Estimate Document
Step 1 – Download the Sample Sheet
- Click 'Download sample sheet' on the 'Draft Estimates' screen to get the estimating sheet in Excel format.
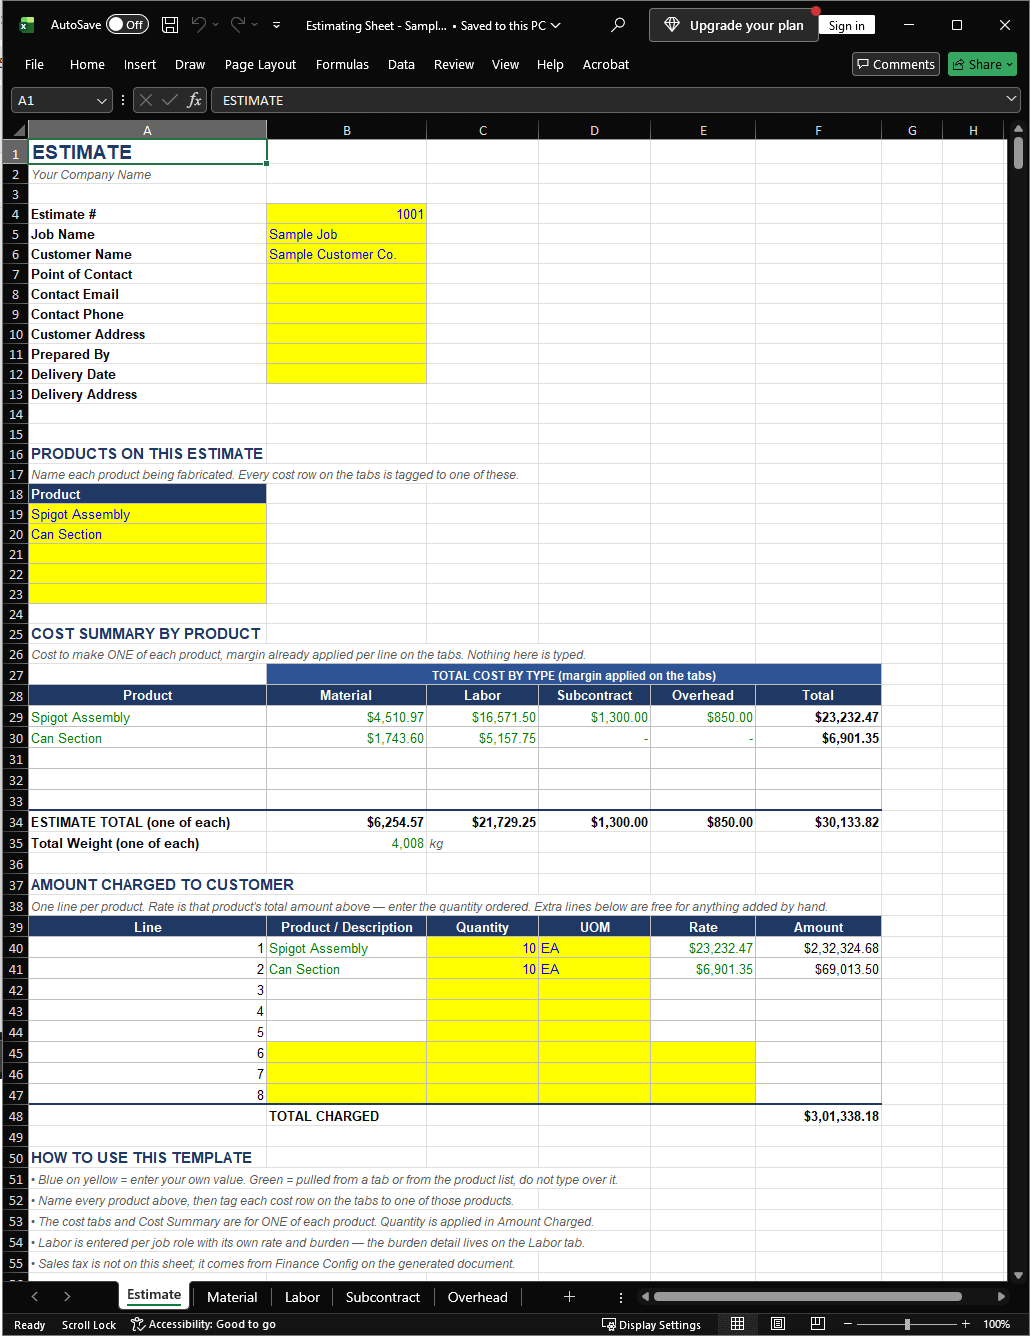
The sheet has an 'Estimate' tab for the job details, products and amounts charged, and a tab each for Material, Labor, Subcontract and Overhead costs.
Step 2 – Prepare Your Estimating Sheet
Enter your values into the sheet. Enter values only in the cells highlighted in yellow. The cells in green are calculated or pulled from the other tabs, so don't type over them.
Step 2-1 – Estimate Tab
- Enter the following details:
Job details – The estimate number, job name, customer and contact details, delivery date and delivery address.
Products on this Estimate – Every product you will fabricate for the job.
Amount Charged to Customer – The quantity ordered for each product.
Don't add sales tax to the sheet. You can enter it on the 'Product Estimate' step after you upload the sheet.
Step 2-2 – Cost Tabs
On the 'Material', 'Labor', 'Subcontract' and 'Overhead' tabs, add one row per cost line. Enter costs for one unit of each product. The quantity is applied only under 'Amount Charged to Customer'. Every tab has the following columns:
- Cost Code – A cost code from your company's list.
- Product – The product this cost line belongs to. It must be one of the products listed on the 'Estimate' tab.
- Description – The description of the cost line.
- Margin % – Your margin on the cost line. The Margin $ and Total Amount are calculated automatically.
Each tab also has its own columns:
Material – One row per material line. Enter:
- Quantity, UOM and Cost/unit – The quantity of material, its unit of measurement and the cost per unit. The Amount is calculated automatically.
- Total Weight – The weight of the material (if applicable).
- Vendor / Quote Number – The supplier's quote reference.
- Supplier Name – The supplier's company name. It can be a company in your company directory or a new one. You can add new companies to your directory when you upload the sheet (see the note below).
- PO# (optional) – The number of the purchase order issued to the supplier for this material. Leave it blank if you haven't issued a purchase order yet.
Labor – One row per job role, per product. Enter:
- Job Role – The role doing the work, for example, Detailer, Fitter or Welder.
- Hours – The hours needed for one unit of the product.
- Rate/hr and Burden/hr – The hourly wage rate and the hourly burden. The Base Cost, Burden $ and Charged Cost are calculated automatically, where Charged Cost = Hours × (Rate + Burden).
Subcontract – One row per subcontracted scope, such as painting or galvanizing. Enter:
- Subcontractor – The subcontractor's company name. It can be a company in your company directory or a new one. You can add new companies to your directory when you upload the sheet (see the note below).
- Quantity, UOM and Cost/unit – The quantity of work, its unit of measurement and the subcontractor's cost per unit. The Amount is calculated automatically.
- Quote Reference – The subcontractor's quote reference.
- PO# (optional) – The number of the purchase order issued to the subcontractor for this scope. Leave it blank if you haven't issued a purchase order yet.
Overhead – Freight, consumables and any other overhead. Enter:
- Amount – The overhead cost.
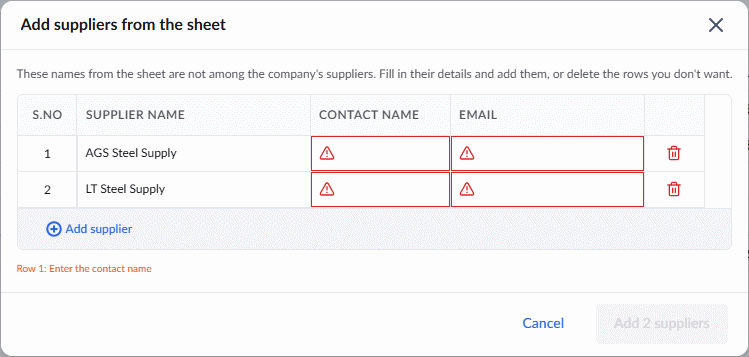
Note: You can include suppliers on the 'Material' tab and subcontractors on the 'Subcontract' tab even if they aren't in your company's directory yet. When you upload the sheet, Linarc finds these new companies and shows a confirmation dialog for each type: one for suppliers and one for subcontractors. In each dialog, enter the contact details for each company, such as the contact's first name and email, and confirm. Linarc then adds them to your company's directory. This way you don't have to set them up before you import the sheet.
Step 2-3 – Save the Sheet
- Save the file on your computer with a suitable name, in .xlsx or .xlsm format.
Step 3 – Upload the Sheet
- Click 'Browse' on the 'Draft Estimates' screen and navigate to your saved sheet.
- Alternatively, drag and drop the file into the upload area.
The draft estimate is created with the values from the sheet. The site address is matched to a location automatically.
Step 4 – Review and Correct the Values
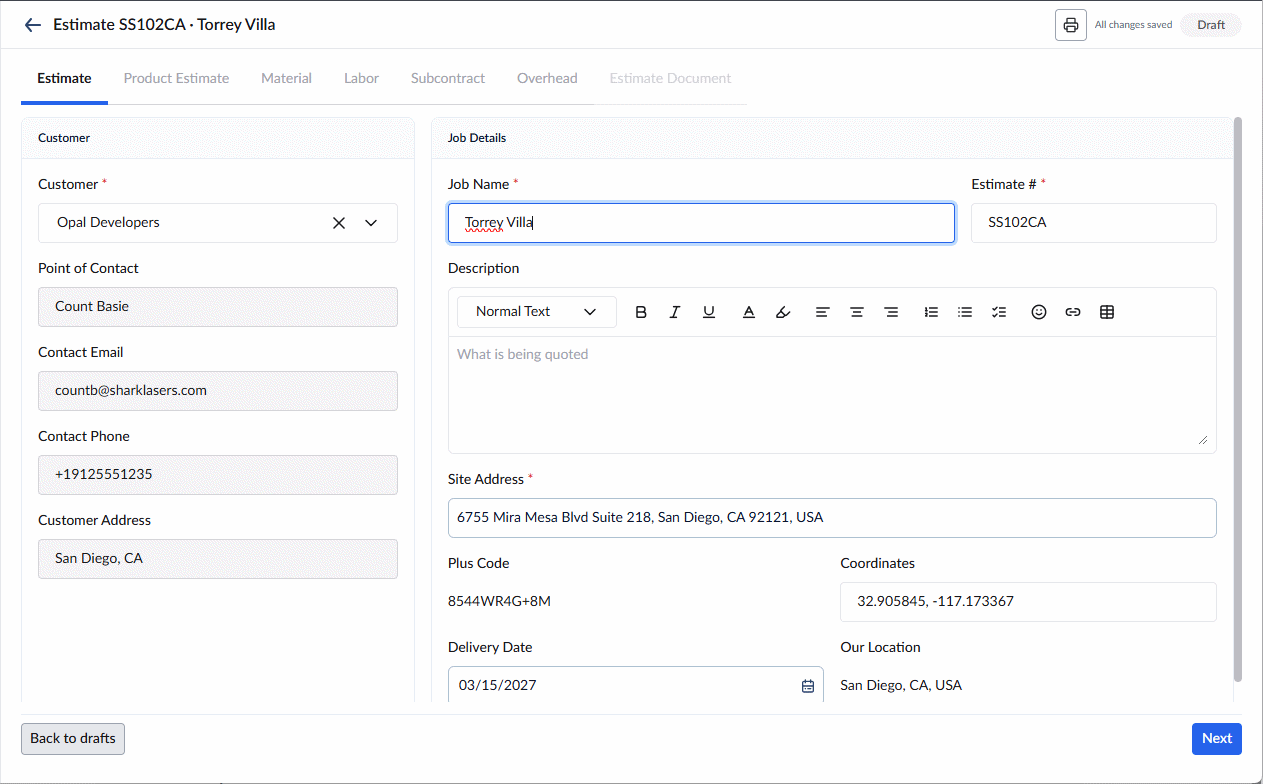
Go through each step and correct any values flagged in red. Click inside a cell to enter or select the correct value. For example:
- Customer – Select the customer from the drop-down, or click '+ Add customer' to add them.
- Estimate # – Enter a different number if another estimate already has the same number.
- Cost Code – Pick a code from your company's list if the code in the sheet is not on it.
- New suppliers and subcontractors – If the sheet includes suppliers or subcontractors that aren't in your company's directory, Linarc lists them in a confirmation dialog: 'Add suppliers from the sheet' for suppliers and 'Add subcontractors from the sheet' for subcontractors. In each dialog, enter the contact's first name and email for each company and confirm to add them to your company's directory. You can also delete rows you don't need, or select an existing company from the drop-down in the cell.
Step 5 – Build and Manage Rows
You can add more products or cost lines to the imported estimate. Click 'Add product' or 'Add line' at the bottom of the table and enter the values. See Step 4 – Add the Cost Lines under 'Create Estimate Manually' for details.
The sheet doesn't include sales tax, so add it now if it applies. Go to the 'Product Estimate' step and enter the Sales Tax % in the 'Totals' panel. The sales tax and total are recalculated automatically.
Step 6 – Generate the Estimate Document
Once all the values are correct and the cost lines of every product add up to its rate, click 'Generate' on the 'Overhead' step to create the estimate document. See Submit a Bid for the next steps.
Next Steps:
- Submit a Bid: Generate the estimate document as a PDF and send it to your client from within Linarc, or share it through any other channel. See Submit a Bid.
Was this article helpful?
That’s Great!
Thank you for your feedback
Sorry! We couldn't be helpful
Thank you for your feedback
Feedback sent
We appreciate your effort and will try to fix the article